Thursday 31 October 2013

Top 100 Christmas Samples 18 - 23

 Good evening everyone, tonight and tommorrow I shall share extra samples with you so  next week I can fit in the Christmas cards I have been making for this year over the last couple of weeks using some if not all of the new stencils now available at Imagination Crafts. Tonight's samples are created with some Christmas Picture stencils.

 18, The clearing stencil, using the same technique as last nights cards for the back ground, this was done in two stages masking out the trees at first and used stencil paint jet black for the stag , then when that was dry mask out the deer and use Gunmetal grey Sparkle Medium for the trees  by adding puffa silver glitter on them and whit fluffy stuff with diamond glitter on the ground at the base of his feet,makes it look a frosty morning, the tag and ribbon from the Snowy set. I've the mounted on black glossy card .
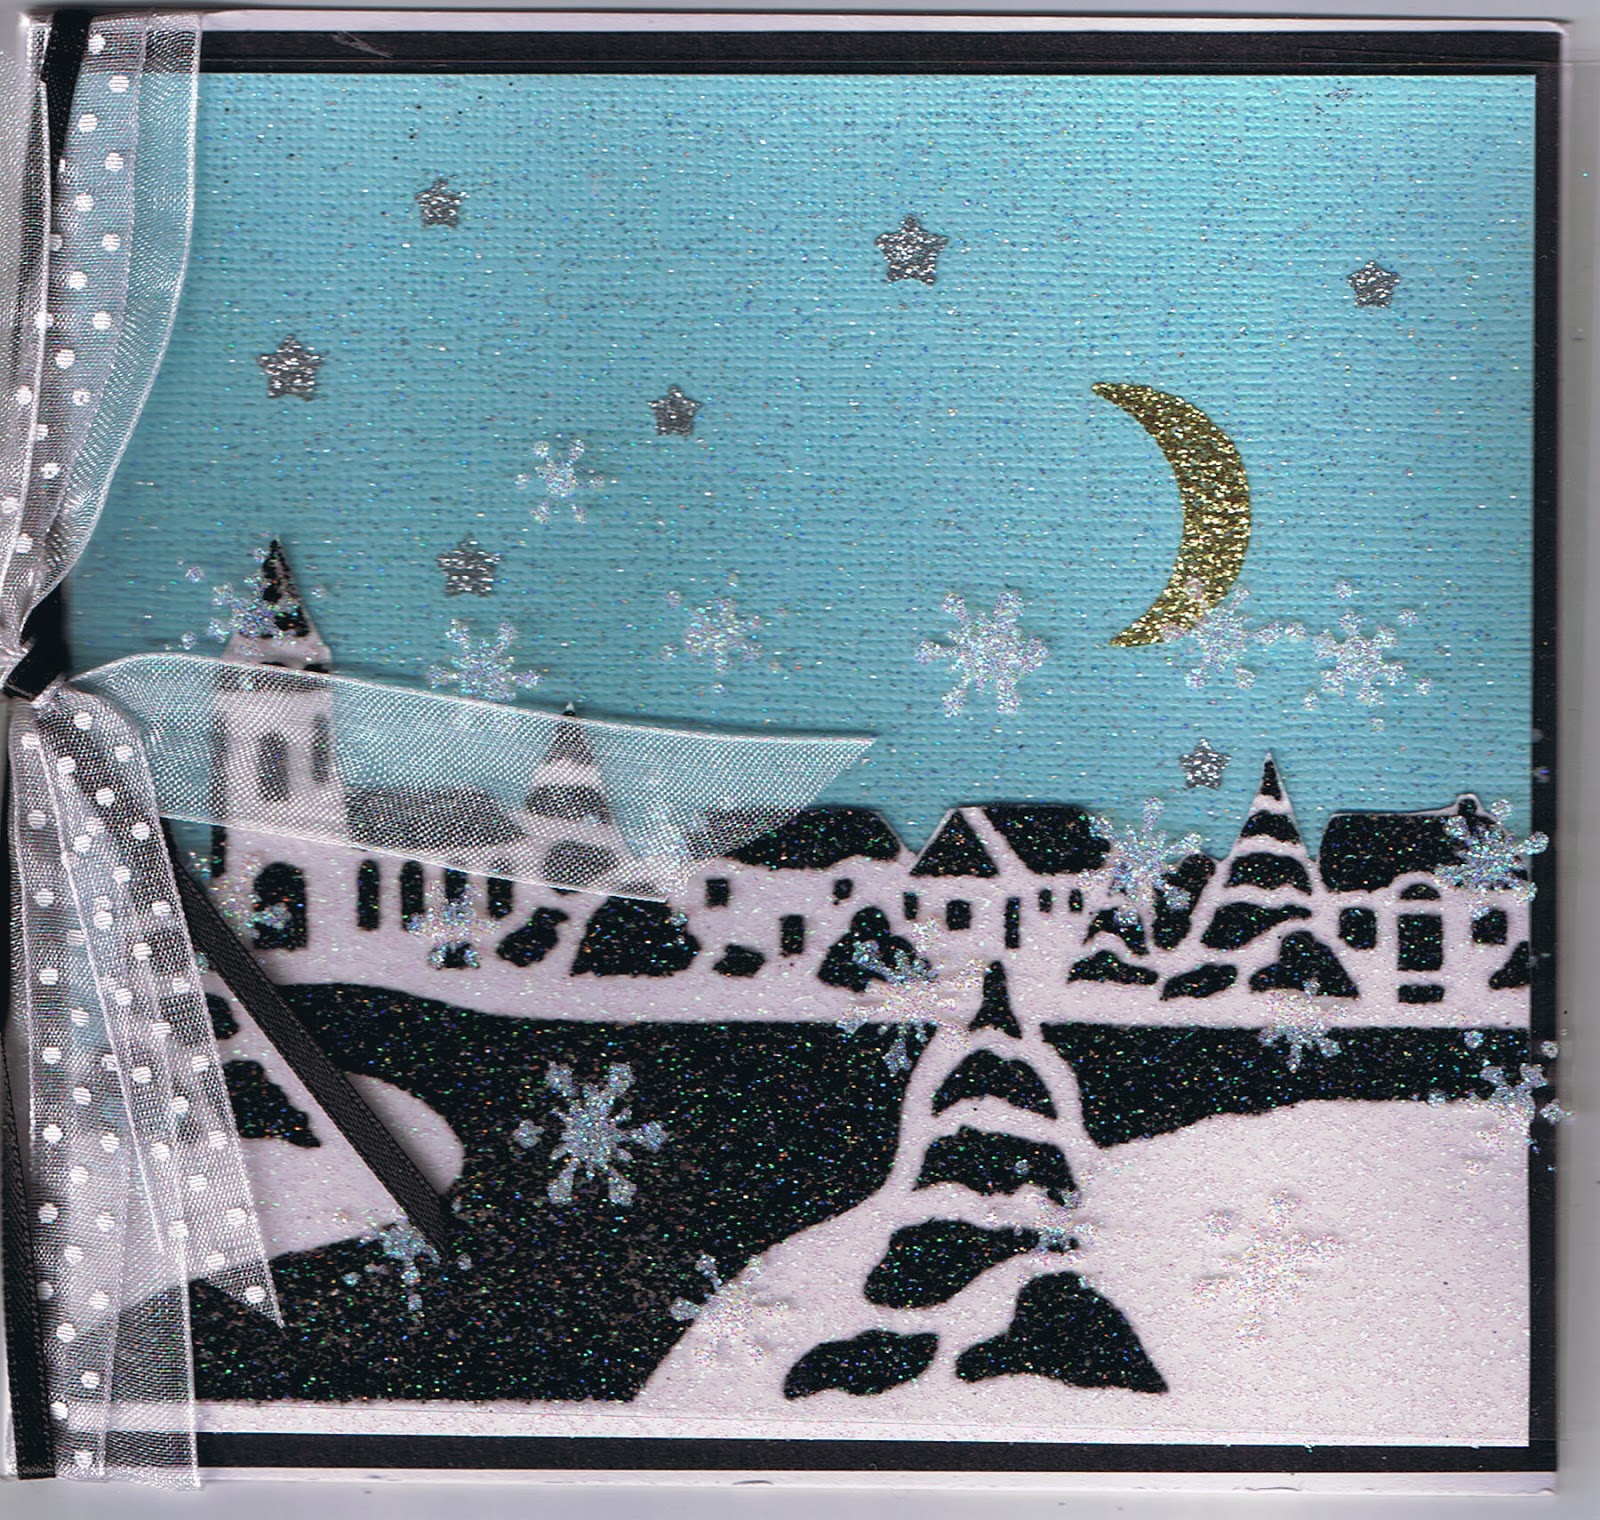
19, Snowy Village Stencil, use the stencil on two bases, one blue one white I think this white was actually glittercard when both are dry  cut away the sky area from the white, then match up over each other to reveal the back sky and the front one snowy, ok while i was doing that on acetate I've used the snow flakes from snowy park Stencil across the middle when you tuck in the acetate, it will look like it's snowing, to finish wrap the ribbon.

20,This is the night version of the sample above
 21, Hanging Bauble Stencil, on glossy card using versa mark sponge through the stencil lift away the stencil and sprinkle with mica powders, I choose the blue and purple tones, buff and set with hair spray, repace the stencil over the images again and use a seperate sponge and pick up a little sparkle medium I''ve used silver  and dab and swirl some all over gently and fairly quickly use silver Sparkle medium also for the sparkles and tops of the baubles with a spattular, to finish add silver ribbon to top right corner. mounted onto lilac satin card stock then onto the card.
 22, Roof tops Stencil this was the the same technique, I did for the baubles only this time was with copper golds and blue mica powders and Gold shimmer Sparkle medium,for the dabbing, then simply mat and layer on gold the black card before attaching to the card.this effect is really cool It really does look like the night sky and the glow of the moon, sprinkling the magic of christmas ...I do love this technique so effective ....
23, Bethlehem, I prepared the back ground first by using the versamark ink pad all over the white card stock add copper and gold mica as above from side to side really cover the whole area, buff and spray with hairspray, once dry use jet black stencil paint over the stencil, I've tied the ribbon as a sash and added curled wire,


 The Clearing
 Snowy Village
 Roof tops
 Hanging Baubles
Bethlehem


Thank you for dropping by today morrow again tomorrow till then Happy Crafting    Jayne x

Wednesday 30 October 2013

Top 100 Christmas samples 13 - 17


 Good evening everyone , sorry no blogging last night I got a bit tied up with moving all my stash into the New Studio .....Pics coming soon on the new blog, so I'll make up for it by sharing 5 with you tonight, this cute Snowy park Stencil and Stamp set  was from a few years back but still a favorite with me


13, Snowy stamped onto acetate and sparkle Medium spread across the back set aside to dry , The background is created by using Ink a dinks with a resist technique and then re stamped and embossed with silver e/p this layer then was trimmed and mounted on silver satin card stock the card on diagonal corners were stamped using Peacock  Brillance ink pad with the extras in the Stamp set the tag was also from the stamp set cut out and mounted with a snowflake brad, I've also used punch out snowflakes and attched Snowy when he was dry....


14,  the back ground panels were created the same way using versamark resist technique, and embossed as the card above this time cut the base into panels and mount on the silver card, Silver Encore ink pad was used to stamp the card before mounting the panels .Let it snow greeting again embossed with silver e/p and mounted on silver card then to finish wrapped white dotty ribbon this also keeps the insert in place..
 15, first of all prepare the back ground as before by using versa mark with a piece of cut and dry through the stencil and use the inks in the resist technique then I've used Black stencil paint this time on the stencil but masked out Snowy and the snow flakes, Snowy was stamped onto acetate as for the first card and remounted over where he should be , again wrap the ribbon and tie in a bow to finish
16, This was done twice from the stencil once on blue satin shimmer card and onceon white satin shimmer both with stencil paint once dry cut where the snow would be on the ground, use a little sparkle on the white snow flakes and around the base of snowy the tags were stamped cut out and mounted on the same blue and again attched with a snowflake brad, the background was stamped with versamark and left to dry, wrap the ribbon and attach the tag on that ribbon I the gently slid the snowy panel under and attach, then mount complete layer onto the card.
 17, his last card was created with all the left over pieces, using the techniques as before,the only extra stencil I used here was snowflakes, and using a piece of cut and dry with the brillance ink pad Twilight, sponged through on the tags, Snowy was done with lavender and turquiouse Sparkle Medium. I've threaded beads onto the ends of the ribbon and added gems to the tags,, I love the colours


 Snowy Park Stamp set

Snowy Park Stencil,

Thank you for dropping by...more tommorrow till then 

Happy Crafting Jayne x 

Monday 28 October 2013

Top 100 Christmas samples no 11 and no 12


Hello everyone, I hope you all have had a good weekend and that you are all safe and sound after these 80 mile an hour winds , we had a pretty rough ride between 5am -7am this morning  and only a few minor mishaps,and no eletric for 5 hrs was fun ... but we are all fine, And as the weather was so foul over the weekend I stayed in the indoor Workroom and made many Christmas card fronts using the new Stencil designs for 2013 of which I shall posting mid week next week once I get them mounted onto cards and scanned.
Tonight we shall look at sample 11, and 12, created with the adorable Donkey Decoupage stamp sets available from Imagination crafts.


Donkey Decoupage Stamp set


 No11, I love the colour tones on this sample the blue backing paper is from Craft Creations, Bazzil basics blue for the base layer , this time I've coloured with copics as a frame so the gate will stand out 6 layers in all from the back to the donkey's head. Watercolour pencils on the sky on the base card to create the clouds and light blue sky once all is dry I've added detail Diamond, the greeting is simply stamped and mounted onto the same blue card and attached over the ribbon that was wrapped around , a few Gems to finish either side.
No 12 , Water colour pencils this time and I've added the robin on the top of the fence, there is I think only 5 layers including an extra layer of the Holly leaves, I have to say though I used a red felt tip for the berry dots and then just a touch of red detail Sparkle the backing card is a form of light cardboard which I made a tag and stamped the greeting and added the corner holly cluster from the set, the green backing was created by using versa mark through the Flourishes Stencil sponged, then add a sprinkling of mica, buffed and set with hairspray I've then used the detail diamond wand to the curls here and there...

Thank you for dropping by till tommorrow.......Happy Crafting Jayne xx

Friday 25 October 2013

Top 100...Christmas Samples No 9 and No 10

Good evening on this cold windy night... tonight No9 and No10 created with

                                                                   Holly Decoupage
No 9,Mainly using papers this is a classic design, one of the first 6 I designed for Christmas and I have used for my personal Cards every year since , there is just so much you can do with it , Here I've embossed on different patterned papers cut out and layered up , the greeting was made into a tag and ribbon added the dark green backing card was stamped with versamark and left to dry to give a watermark effect, this was then mounted onto gold card and then onto the red card before attaching to the white 7x5 card, now we have the glitter detail wands i may be tempted to add a bit of sparkle, this card is always popular with the people who have received it...And no colouring to do ...
No 10, coloured with Copics 5 layers, and again using Gold detail embossing powders, the gold satin card with Holly swirls through the big shot to give the embossed look, and gems to finish greeting mat and layered on red and green card stock to match the main card, Classic colours for a classic card for Christmas...

thanks for dropping in today more next week in the top 100, I am aiming to make a big start on all my Christmas cards this week end using some of the Newest designs,if I get the chance I'll drop in and share some with you all , have a good weekend....Happy Crafting Jayne x

Thursday 24 October 2013

top 100...Christmas Samples no7 and No 8


Good evening all tonight No7 and No8 created with


                            Holly Scrolls border Stencil               Holly Scrolls Background Stencil
 No 7 using The border stencil carefully mask off all the holly leaves ...I realise this is a bit fiddly but well worth it and I suggest when you do this card make at least 6-10 in one go, as the masking is good for at least that... use the Metallic bronze Sparkle Medium don't worry about the dots ...I covered those with the red detail right at the end, once you have done the first layer ...wash the stencil and re mask all the swirls and dots ready for when layer 1 is dry  I've used Sage green Sparkle Medium for the leaves in the second layer, once this layer is dry you can use the red detail wand on the dots, the greeting from the lantern set stamped in Pearlecsent ivy mounted and layer as shown in matching colours to finish add the bow and wire before attaching to the card....


No8  Now this card done on black glossy card with the Holly Swirl background Stencil Sparkle Gell ( basically it's the base for Sparkle Medium and very handy to have in your stash  you can used it with old slightly dry Sparkle medium ,to revamp it by mixing it in or you can use it on it's own or with glitters) I've used bronze,copper green and gold glitter, by stencilling with the gell take the stencil away and sprinkle Glitters here and there to cover the gell without mixing to much use ribbon and wire lower left corner beside the  stamped and embossed  greeting mounting first on gold then on bronze card stock, as above ...

thank you for dropping by more tomorrow ...till then Happy Crafting Jayne x


Wednesday 23 October 2013

Christmas Sample 5 and 6 Snow flake flurry...


Good evening everyone, 5 and 6 tonight created with


                            Snow flake Flurry Stencil                 Snow Flake flurry Border Stencil,

This Elegant Card is really easy to do and if you have a large amount to make this year try this one... using Silver Sparkle medium on Acetate,set aside to dry .....next Iv'e used White satin card to layer onto Charcoal satin card onto the main card, using one of the border punches from Marther Stewart this was snowflakes,punch the border on the spare card and wrap the silver ribbon and tie a bow, Once the acetate layer is dry, trim to fit the white card and attach down the left side with D/S tape attach the border over the top, a clever way to hide the fixings, thus you get the overlap effect.


No 6 this one using Snowflake flurry Border stencil again on acetate but this time using gold and Metallic Sparkle in the two tones diagonally. I pre stamped the Lantern from the set and coloured with gunmetal sage and gold on acetate on the back keeping the glass clear, once all was dry I added ribbon and wire to attched the lantern this time to attach the acetated background  with gold brads to the backing card gold then bronze..... before attachingto the 6x6 card..

thank you for dropping by more tomorrow till the Happy Crafting    Jayne x

Tuesday 22 October 2013

Top 100....Samples 3 and 4 Lantern Decoupage Stamp Set.


Good evening everyone, tonight samples 3 and 4 are created from the Lantern Decoupage set below,


two totally different ways of using this Lantern Decoupage Stamp set, the first stamping onto acetate and working from the back using Ice blue, Lavender,Sage green,Red and Bright Copper Sparkle medium, there are three layers in this sample but you could do more. The backing was again,Ice Blue Sparkle medium and  Flourishes Stencil on light green cards stock.mat and layered onto light blue and then lilac to create a frame of course you could add a greeting and ribbon wrapped down the crease side to finish.


No 4, has a totally different look and feel, coloured with watercolour pencils and this time 4 layer to the main card but a window frame is created by stamping on the green card and cutting away the center this is then re attached to a lower level thus you can have the Lantern actually swing.... by attaching ribbon through the loop and then re attched around  the top border that has been mounted on the foam tape 3mm...I've even added acetate  for the windows of the lantern. the stamping on the border was with the extra holly stamp in the set with versa mark and left to dry , You could add mica powder for another effect. To finish I've added a little sparkle with a sakura glitter dust pen . this panel was then mat and layered onto green and gold card stock to match.to keep the look flowing with a permant pen i added squiggly lines around the edge,


thank you for dropping by more tomorrow till then .....Happy Crafting Jayne x

Monday 21 October 2013

Top100 Christmas cards 1 and 2


Good Evening everyone today we start the Top 100 well I say top 100 they will appear in no particular order, Although I do have my  favorites but I love them all really.. tonight 1 and 2 both created with the Dove Decoupage set


This card looks a little strange , the reason for that is because it's an open heart window front using the nestie die heart with the dove both sides, And have scanned it flat the square you can see behind the dove is actually on the inside... Firstly stamp onto acetate and use ice blue Sparkle Medium, on the dove and sage green on the olive branch, If you spread it too thickly it will take some time to dry, do  one on one  side of the acetate and the other on the other side, this way when you cut them out they will match, the back ground was the dots and swirls embossable on the light blue satin card and the peace greeting was stamped using a matching colour ink pad..


This one is quite different using mica powders for the background  and the  base layer of the Decoupage stamp, I've then embossed the dove with gold Detail embossing powders, on white card stoack and coloured with the mica powders using a waterbrush dipping it in the mica and mixing on a mat, before applying,one dry, cut out and layer onto the base, the background stencil is flourishes smoothered with versa mark and then put through my big shot I then dusted on the mica from the Nature set gold, bronzes, and old rose sprinkling on diagonally  and buffed, set with a cheap hairspray,  this time I've mat and layered a greeting over the ribbon wrap..

More tomorrow till then Happy Crafting   Jayne x

Sunday 20 October 2013

Thank you....

Good afternoon everyone....to day I have actually managed to make and write  all my birthday thank you cards,I'm stunned....... I haven't been able to do something for myself for the last 3 or so years, I have always been up to my neck with Imagination crafts whether it was Designing or Sample making for shows or new design mock ups, coming up with new ideas or revamp old ideas with new products, Adverts or another deadline that was important to finish, ...to having time on my hands to do the things that I would like to do rather than deadlines to meet .....  it's Fantastic!!! and I've been painting aswell !!!!.....don't get me wrong I loved my Job ...but it was taking over my life.!!!!!!
...
so today  I've scanned these 5 to share with you I've managed to make 20 all using the same products but in different colours, I also found that most of the pastel and glossy card matched most of the fronts, so it was just a case of trimming then re mounting on 6x6 card stock. I added an insert to do all my hand written thank you letters, and all these were created while doing my demo's during using the last years shows, and then I added ribbons and the greeting embossed with gold Detail embossing powders, I think they make excellent quick and elegant cards

Products used:  Birdcages Stencil, Sparkle medium Gold, Hunter Green ,Sage Green, Antique Bronze,Gunmetal, Silver and Old rose. patterned card stock  in order of appearance Cottage Garden,Moments,Wishing Well,Gathering thoughts and Secret Garden,  the colours were applied using the masking and detail technique with a detail spatula,As I was doing at the shows some of you may have seen...if not This may be a good workshop sheet  or step by step to do here on the blog , if you would like a copy or would like to see the step by step, send me a message and I'll tag it on.. hope you enjoy viewing them....


Thanks for dropping by hope to see you again tomorrow when I'm starting the top 100 Christmas Card samples , which will span across my  design Era with Imagination Crafts..so there will be some of the older design samples aswell as the newer ones ...

till then...... Happy Crafting Jayne x

Friday 18 October 2013

Christmas Decoupage stamp sets 2013... Frosty the Snowman...

Good evening All, tonight I have 3 to share with you from Frosty the Snowman Stamp set, but first let me apologise for the photography and or scanning...not the best quality but unfortunately I no longer have the original sample to re-photo or scan I hope it doesn't spoil your viewing


 Frosty coloured with inka dinks in mauve's and soft blues I've layered the scarf and hat twice .There is only a little colouring mainly with inks and  and then detail Sparkle  Diamond and added buttons over the drawn buttons, the background lilac card stock edged with detail sparkle diamond, to finish add snowflake brads  and wrap the ribbon before attaching to the card.
 Frosty stamped with Encore gold and coloured with Copics layered as before frosty himself was stamped onto white card the rest on soft cream again buttons from the big button box, the back ground papers are from first Noel paper bundle. I've threaded red ribbon through the lace and attached the greeting from the set stamped in gold ...with encore ink Pads, I find it is always best to heat set before colouring using Copics or Pro markers...if you closer you can actually see the sparkles from the detailing on Frosty...
And No-3 again using Copics for the colouring in Blue's and soft Lilac's, and my favourite detail Sparkle wand Diamond , this time I coloured the buttons on his belly, I made a tag with the extra Greetings' Let it snow' and tied it to his arm the background papers are from the forever friends design stax, Ribbons to match in a bow on the side..I have to say Frosty would be very easy to cut out and use with some of the new Christmas stencils, will have to try that and get back to you ..all of these stamps  can be purchased via www.imaginationcrafts.co.uk..

well another week flashes passed what to do next week I thought about doing my top 100 Christmas designs and samples and would there be enough time to do them all before Christmas 10 weeks to go before Christmas 10 designs a week 2 a day... that could work ....  and we will start on Monday of next week... till then have a good weekend  Happy crafting Jayne x

Thursday 17 October 2013

Christmas Decoupage 2013...Letter to Santa

Hello to you all, today we are looking at another of this year's Christmas Decoupage 2013 Stamp Sets....Letter to Santa although I think there is a name change to Boy and Sleigh, Again 2 samples to different looks....


 The first layered as a window coloured with tombow pens and then I've covered the snow area with the White fluffy Stuff and adding glitter while wet then when you puff it up it looks like frosting, I've then layered onto red card and then onto Blue snow patterned card stock. wrapped and tied a bow and put the greeting over the ribbon on the right hand side.while colouring I did try to match the blues so you get some colour continuity.....
and the 2nd.... before colouring find the papers you want to use and match the colours, I very often do the planning this way, these papers are from the Forever Friends range Design Stax Kraft notes FFS 160115, then using the colours from the papers match with Copics this time , I've layered twice but this time the frame is flat , by cutting along the bottom edge you can reposition the next layer in it so it's still within the frame and then layered the boy by putting him on his Sleigh, to finish I've used Detail Diamond Sparkle over the snow areas and on the border to give a little sparkle here and there.....this time I've punched holes in the greeting tag and threaded the ribbon through before attaching to the card...

thank you for dropping by ...another tomorrow till then Happy Crafting  Jayne x

Wednesday 16 October 2013

Christmas 2013 Decoupage stamps...The Christmas candle


Good evening everyone, the weather here has been changeable today rain then sunshine but still getting colder....tonight the Christmas Candle Decoupage stamp set, a very traditional style of samples yes both red candles but would work just as well in different colours....


 The first coloured with tombow pens and layered 5 in total, there is probably another layer , if you wanted to do the candle' s flame twice, and have used detail sparkle on the berries and leaves, Ribbon wrap , but attached the bow and greeting as a tag there is also a light splattering of mink sparkle medium on the edges of the satin red card, then mat and layered onto pastel green then on deep green satin card stock...
And the 2nd more so in the traditional look...I recently bought the First Noel paper pack this is one of 24 sheets  ( 2 of each sheet) all I've  added to it is the swirls from the stamp set , stamped with Encore gold Metallic, which is a lovely soft gold sheen Using the same ink pad to stamp out 5 layers and the greeting coloured with Copics and touched up here and there with the diamond detail sparkle wand. I've also added candy dots with a swirl for the berries and a tartan ish ribbon as a bow attached using a small star brad, this was then all mounted onto red pearl cardstock and then onto Gold satin card.I can see me doing a few more of these and maybe different coloured candles..

thanks for dropping in see you tomorrow night till then Happy Crafting .....Jayne x